Freehand Drawing
This tool will allow the user to draw both open and closed vector paths in a freehand style which closely mimics the flow of drawing with a physical pencil and really excels at creating quick initial design sketches and organic flourishes.
Optionally paired with a Windows compatible graphics tablet, this tool will enable you to draw your paths with a stylus, giving a more faithful simulated drawing experience.
The resulting image you see on screen still exists as vector information including automatically placed nodes and handles, meaning that you then have the option to use the same shape editing tools as any other path within the software to further edit and manipulate the vectors you have initially created with the Freehand Draw Tool.
Open paths with Freehand Drawing Tool
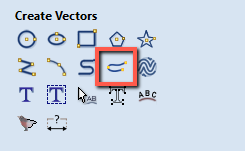
1. Under the create Vectors section of the Drawing panel > Select the Freehand Drawing Icon.
2. Left click and hold within the workspace to place a first point and the path will then follow the direction of your cursor. Whilst active the cursor will change to a Cross-hair and the drawn path will follow it's centre point.
Note
If Stabilisation is applied, a reticle will appear next to the cursor. This is explained under Freehand Draw Options below.
3. Release to place end point and finalise path.
Close Current Stroke
Whilst actively drawing an open path click TAB To join the the current point with the Path's start point creating a closed vector shape
Extend Existing open Vector path
In order to extend an existing open vector using the Freehand Drawing tool;
1. Hover your cursor over the point you wish to join from
2. Holding down Ctrl > within the immediate area of this point > Drag to draw path
3. Release to complete path.
Join On to Existing Vector
Whilst you are actively drawing a path with the held down, and you would like to join this to an existing open vector;
1. Press and hold Ctrl > Hover cursor over the Start or end point of another open vector
2. Release To complete path and join this to existing open vector line, creating one continuous path.
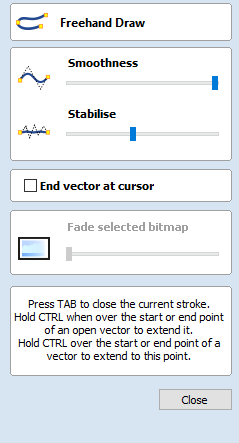
Freehand Draw Options
Smoothness
This option, controlled by the below slider, controls to what extent smoothing is applied when the is released and the path completed.
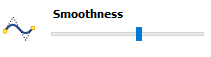
The further the slider is to the left the smaller the amount smoothing that is applied and any angular changes in direction will be retained once the is released and the path completed.
The further the slider is to the right the greater the level of the smoothing effect that is applied; Sharp angles are smoothed into curves and the path is simplified with fewer individual nodes created.
Stabilise
The stabilisation setting controls how much small movements with the mouse or stylus will be damped out whilst drawing.
This is controlled within the form by the below slider;
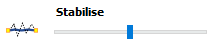
The further the slider is to the left, the less stabilisation is applied when drawing and even small changes in direction from the mouse/stylus will show in the resulting path.
The further the slider is to the right, the more stabilisation is applied and the tool will damp out small jitters in the mouse/stylus movement to produce a smoother path.
When an amount of stabilisation is applied a circle will be shown around the start point of the path when you start drawing and follow the end point of the path. Within the zone of this circle movement of the cursor will not extend the path. The cursor needs to move to the edge of this zone at which point the path will start moving towards the cursor. As cursor movements within this zone do not affect the path it also allows precise sharp changes of direction as you can move the cursor back into this deadzone then off in a different direction easily.
End Vector at Cursor
With this option unchecked; when the left mouse button is released, the end point of the actively drawn path will be placed in the centre of the reticle which appears to indicate the level of stabilisation being applied.
If instead you wish for the end point to be placed in the position of the cross hair cursor when the button is released, you can check the box next to this option. As the end point will remain the same regardless of the level of stabilisation applied, this can lead to greater accuracy in predicting the end of your drawn path.
Fade selected Bitmap
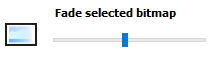
One of the many useful applications for the Freehand draw tool is for greater control over the tracing of imported bitmap images. By using the Fade selected Bitmap slider, the user can control the level of transparency for the selected Bitmap you are tracing over.
The further the slider is to the left - The lower the transparency of the selected bitmap, until completely opaque.
The further the slider is to the right - The level of transparency increases, giving the drawn path higher contrast against the traced image and making it easier for the user to distinguish on the screen.
Exiting Freehand Draw Form
Once you have completed your drawing and wish to exit from the freehand draw form, either;
- Click the
- Or Press the 'Close' button at the bottom of the form in the drawing panel.